In our previous post we saw how to create a server on AWS and access.
We have a brief idea of what Amazon charges for. In terms of webserver without a database, it depends on
- Amount of resources consumed by your
EC2instances - Amount of data transfer via the
Internet Gatewayto serve internet traffic outside AWS.
This post, we will understand
- What is a VPS?
- what is an ECS? and a Cluster
- what is an Auto Scaling Group (ASG)
- how ECS uses ASG to manage cluster?, and lastly
- how to use a Load Balancer? across multiple subnets.
Boring details
VPC
To understand a VPC (Virtual Private Cloud), we have to understand a Public Cloud.
Public Cloud is basically when you have a single infra (not a single instance, but the whole infra as a whole), shared between multiple people.
For example a restaurant serving multiple dishes. Most SaaS appication.
But a Private Cloud is when you want to set boundaries on the network, resources etc thats available to the clients. Such that one doesn’t access other’s information or resources.
For example, many people can use AWS but the content served is different for different clients. But that doesn’t mean, each client/company gets its own set of servers. It might as well be shared with some other processes.
So you get your own nameservers, (DNS servers) which help you translate IP or DNS and connect to the devies on that network. You can’t access them from your internet like you do for facebook or google.
You can specify an IP address range for the VPC, add subnets, add gateways, and associate security groups. Although you have mostly 10.x.x.x and 172.x.x.x for amazon in ap-south-1
Subnet
Since you can assign IP address range, you can also borrow from this ip range to split traffic between multiple regions.
Each subnet must be associated with a route table, which specifies the allowed routes for outbound traffic leaving the subnet.
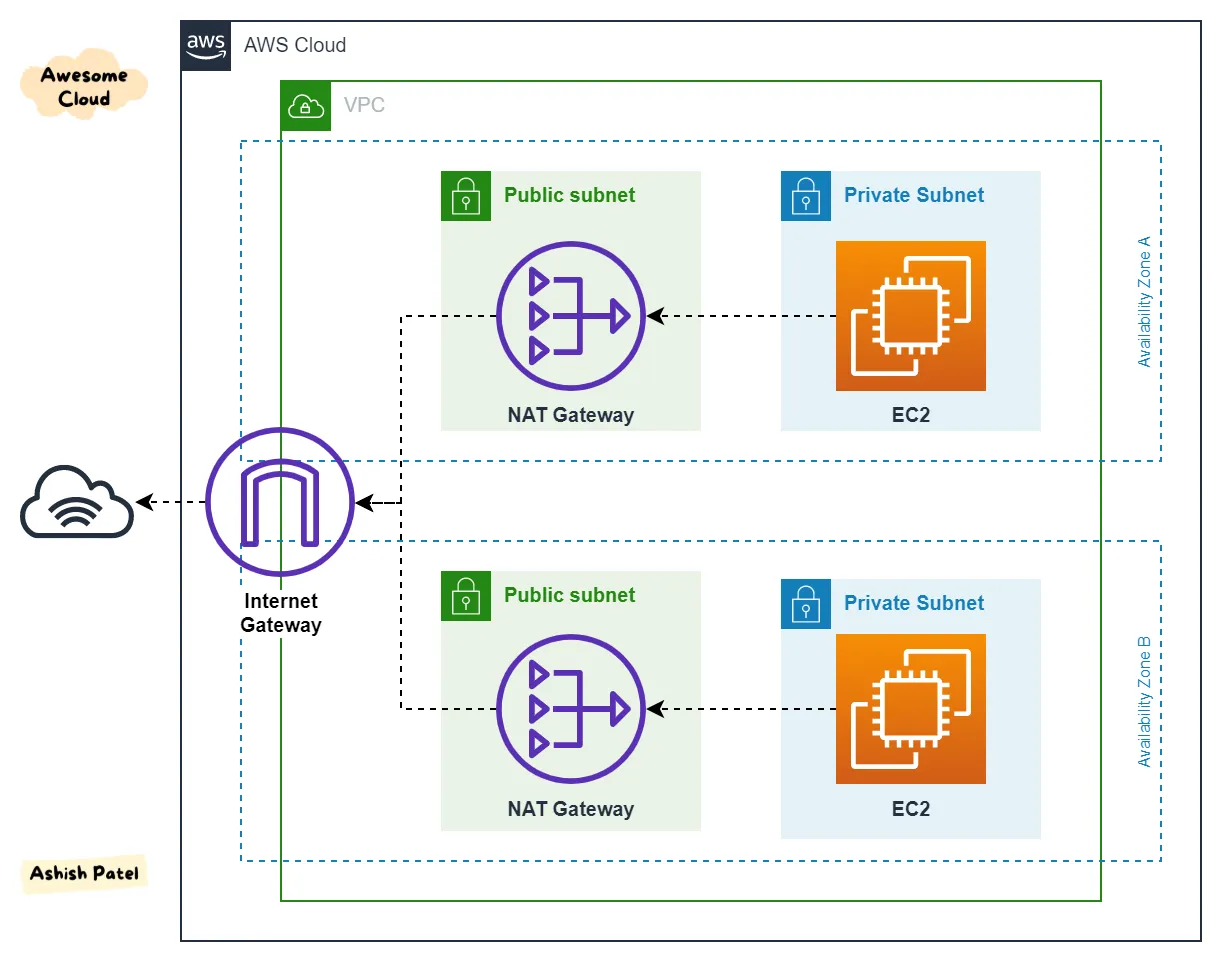
Internet Gateway
Now AWS’s way of exposing a VPC to receive external traffic is by using an Internet Gateway. An example will help understand it better.
A router is a gateway between your local network (your VPC) and the ISP. It allows you to share internet using Wi-Fi of multiple devices and connect to your ISP. On the ISP’s end’ its a device that connects to the outside world to get the data and send it back to you.
It is also a protocol converter, because LAN uses different protocol than rest of the Internet.
Before arriving at the router, packets go to the gateway channel first, and the gateway checks the header information at once. After checking for any kind of error in the destination IP address and packet. According to the needs of the destination network, it carries out data conversion and protocol conversion on the packet, which is also the most critical step. Finally, the processed packet is forwarded to the router to establish intelligent communication between the two different networks.
Anyway, its a separate component, so that you can attach and deattach your vpc from the internet faster.
Route table
A route table contains a set of rules, called routes, that determine where network traffic from your subnet or gateway is directed.

Code bombs.
Basically we want to:
- Create a VPC and assign a range of ip address. here we chose the range
/16 - Create two
subnetsin tworegions. Also called __A__vailability __Z__ones - Create an
Internet Gatewayand attach it to theVPCon one end - On the other end, create a
route tablethat allowstraffic from internetto thissubnetvia thegateway

Enable internet access for a VPC using an internet gateway - Amazon Virtual Private Cloud
aws_deploy.tf
provider "aws" {
  region = "ap-south-1"
}

// Create vpc and add a subnet
// Add a routing table and direct all traffic from internet
// to the subnet
resource "aws_vpc" "app_vpc" {
  cidr_block = "10.0.0.0/16"
  enable_dns_support   = true
  enable_dns_hostnames = true
  tags       = {
      Name = "Konoha VPC"
  }
}

// Create subnet 1
resource "aws_subnet" "app_server_subnet" {
    vpc_id = aws_vpc.app_vpc.id
    cidr_block              = cidrsubnet(aws_vpc.app_vpc.cidr_block, 8, 1)
    map_public_ip_on_launch = true
    availability_zone = "ap-south-1b"
}

// Create subnet 2 and its routing table
resource "aws_subnet" "app_server_subnet2" {
    vpc_id = aws_vpc.app_vpc.id
    cidr_block              = cidrsubnet(aws_vpc.app_vpc.cidr_block, 8, 2)
    map_public_ip_on_launch = true
    availability_zone = "ap-south-1b"
}

// Create an IG for the VPC
resource "aws_internet_gateway" "app_server_ig" {
  vpc_id = aws_vpc.app_vpc.id
}

// Routing table which allows traffic
// from anywhere to the VPC via the IG
resource "aws_route_table" "app_sever_rt" {
  vpc_id =  aws_vpc.app_vpc.id

  route {
      cidr_block = "0.0.0.0/0"
      gateway_id = aws_internet_gateway.app_server_ig.id
    }
}

// Making subnets public by attaching them to the routing table
// which is associated the the app_server_ig Internet Gateway

resource "aws_route_table_association" "app_server_route" {
  route_table_id = aws_route_table.app_sever_rt.id
  subnet_id = aws_subnet.app_server_subnet.id
}

resource "aws_route_table_association" "app_server_route2" {
  route_table_id = aws_route_table.app_sever_rt.id
  subnet_id = aws_subnet.app_server_subnet2.id
}
ECS
Elastic Container orchestration Service, as the name implies, deals with creating ec2/fargate instances (forget fargate for now, this is fancy enough).
Its used to manage a cluster of ec2 instances. Like a swarm of bees. Teach that to your kids.
For this we need to provide a task definition file, which will tell what image to run, or what commands to run, resource allocation, ports to expose etc.
ecs_task_definition.json
[
  {
    "essential": true,
    "memory": 512,
    "name": "konoha-server",
    "cpu": 1,
    "image": "${IMAGE}",
    "environment": [],
    "portMappings": [
      {
        "containerPort": 9090,
        "hostPort": 9090
      }
    ]
  }
]
You can read about it here.
aws_deploy.tf
resource "aws_ecs_cluster" "app_server_cluster" {
  name = "app-server-cluster"
}

resource "aws_ecs_task_definition" "app_task_definition" {
    family            = "konoha-server"

    // We dont need this for EC2 instances.
    // task_role_arn      = format("arn:aws:iam::%s:role/ecsEcrTaskExecutionRole", var.AWS_ACCOUNT)
    // execution_role_arn = format("arn:aws:iam::%s:role/ecsEcrTaskExecutionRole", var.AWS_ACCOUNT)

    container_definitions = templatefile("${path.module}/templates/ecs/ecs-task-definition.json", { IMAGE: var.DOCKER_IMAGE })
}

// Assoicating the task deifintion to the cluster
resource "aws_ecs_service" "app_ecs_service" {
    name = "konoha-server" // keep the name same here as the family
    cluster = aws_ecs_cluster.app_server_cluster.id
    task_definition = aws_ecs_task_definition.app_task_definition.arn
    desired_count = 1


    force_new_deployment = true
    triggers = {
      redeployment = timestamp()
  }
}
Please make sure to the the directory structure to your resources match in the terraform file
You can’t really have a different host and container port mapping, cause penny pincher Amazon doesn’t allow it. This will also cause us to open port 9090 on the security group. And therby requiring a Load Balancer (:80) to map traffic with a prefix or domain to the cluster on 9090. Lol
Auto Scaling Group
Auto Scaling Groups allow you to increase, decrease or maintain the allocation of ec2 instances. There are different scaling providers.
You can read about them here
An ASG would use the aws_launch_template in order to provison the machine for ECS to run its task.
The way the ASG and the ECS communicate is via a config file which is expected to be present each of the EC2 instances. That file contains the cluster name.
Previously in the aws_ecs_service we had joined the cluster to the task_definition. And with the cluster name present in the EC2 instance, ECS knows which machine to run the task on. Phew!!

Deep Dive on Amazon ECS Cluster Auto Scaling | Amazon Web Services
ecs.sh
#!/bin/bash

echo ECS_CLUSTER=app-server-cluster >> /etc/ecs/ecs.config
ecs_deploy.tf
// resource "aws_instance" "konoha_server" {
//   ami = "ami-027a0367928d05f3e"
//   instance_type = "t2.micro"
//   associate_public_ip_address = true
//   key_name = "tf-key-pair"
//
//   vpc_security_group_ids = [aws_security_group.konoha_api_sg.id]
//
//   iam_instance_profile = "ecsInstanceRole"
//
//   user_data = base64encode(templatefile("${path.module}/templates/ecs/setup.sh", {
//        IMAGE = var.DOCKER_IMAGE,
//        AWS_ACCOUNT = var.AWS_ACCOUNT
//   }))
//
//   tags = {
//       Name = "konoha-api-instance"
//   }
// }

resource "aws_launch_template" "app_server_launch_configuration" {
  name_prefix = "konoha-server"
  image_id      = "ami-027a0367928d05f3e"
  instance_type = "t2.micro"
  key_name      = "tf-key-pair"
  vpc_security_group_ids = [aws_security_group.konoha_api_sg.id]

  iam_instance_profile {
    name = "ecsInstanceRole"
  }

  user_data = filebase64("${path.module}/templates/ecs/ecs.sh")
}

resource "aws_autoscaling_group" "app_server_ecs_asg" {
  name                = "AppServerAsg"
  vpc_zone_identifier = [aws_subnet.app_server_subnet.id, aws_subnet.app_server_subnet2.id]
  target_group_arns = [aws_lb_target_group.app_lb_tg.arn] // linking to the LB

  launch_template {
    id = aws_launch_template.app_server_launch_configuration.id
    version = "$Latest"
  }

  min_size         = 1
  max_size         = 1
  desired_capacity = 1

  health_check_type         = "EC2"

  tag {
    key                 = "Name"
    value               = "AppServerInstance"
    propagate_at_launch = true
  }

  tag {
   key                 = "AmazonECSManaged"
   value               = true
   propagate_at_launch = true
 }
}
We will use no Scaling Policy, which is manual scaling policy. All capacity is set to 1, because Free Tier baby.
You can checkout one of the examples of a dynamic policy, where it scales based on cpu utilization limit.
AutoScaling Ec2 Instances based on CPU usage using Terraform
You might as well take a break and stretch a leg.
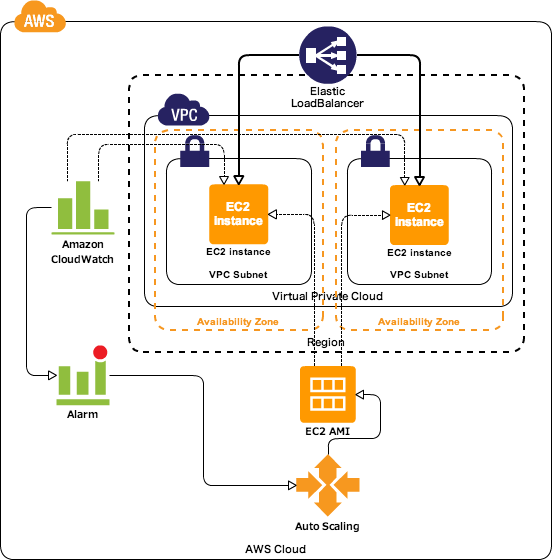
Load Balancer
Its nearing the end of the setup. All we need is a load balancer. For a load balancer, we will forward all traffic on port 80 having a path /konoha/api to port 9090. And the way to associate that is by using a target group.
You can specify health check on your target group, which in our case is sending a /ping request on port :9090.
From inside the VPC on only one server is running on that port, which is our server. You can go through the links below, but the setup is quite easy here.
- aws_lb an
application load balancerto manage traffic, like nginx. - aws_lb_target_group to specify the
VPCand thePORTmapping. - aws_listener and aws_listener_rules which is like a router, which has rules on which
aws_lb_target_groupto forward traffic to. - aws resources on target-group and how to register

// Create an application load balancer attached with
// a security group and which zones to be present in.

resource "aws_lb" "app_lb" {
  name               = "app-server-lb"
  internal           = false
  load_balancer_type = "application"

  security_groups = [aws_security_group.konoha_api_sg.id]
  subnets         = [aws_subnet.app_server_subnet.id, aws_subnet.app_server_subnet2.id]

  enable_deletion_protection = false

  tags = {
      Environment = var.ENVIRONMENT
      Name = "KonohaServerLoadBalancer"
    }
}

// Load balancer target group which is resposible for
// identifying which VPC to sent traffic and what port
// Depending on the health check, the target groups are
// registered or deregistered.
resource "aws_lb_target_group" "app_lb_tg" {
    name = "KonohaServerTgHttp"
    port = 9090
    protocol = "HTTP"
    vpc_id = aws_vpc.app_vpc.id

    health_check {
      healthy_threshold   = 3
      unhealthy_threshold = 10
      timeout             = 5
      interval            = 30
      path                = "/ping"
      port                = "9090"
      matcher             = "200-388"
  }
}

// This here is the LB listening on port 80
resource "aws_lb_listener" "app_lb_listener" {
    load_balancer_arn = aws_lb.app_lb.arn
    port = "80"
    protocol = "HTTP"

    default_action {
      type = "fixed-response"

      fixed_response {
       content_type = "text/plain"
       message_body = "HEALTHY"
       status_code  = "200"
     }
    }
}

// This rule allows urls with /konoha/api/ prefix
// on port 80, to be forwared to the KonohaServerTgHttp target group
// which send the traffic to port 9090 in the VPC
resource "aws_lb_listener_rule" "app_server_lb" {
  listener_arn = aws_lb_listener.app_lb_listener.arn
  priority = 100

  action {
      type = "forward"
      target_group_arn = aws_lb_target_group.app_lb_tg.arn
    }

  condition {
    path_pattern {
      values = ["/konoha/api/*"]
    }
  }
}
Here is a Gist of everything till now. Feel free to use it, modify it, or ask for help in comments.
Next Steps:
Well, now everything over the network is unencrypted, cause we are not using HTTPS on port :443.
For that we will need to have to create a Route 53 thing, which will allow us to generate certificates, which we can attach. The auto renewal is done by AWS. I pray.