Make Your Laptop Work Overtime as a Web Server: A DIY Guide
In this article, I’ll share some exciting ideas and steps to help you embark on this adventurous journey. While this approach may not be the most secure, it’s definitely fun. So, let’s dive in.
Prerequisite:
- Laptop or Any form of computer
- Internet connection. Preferably a broadband connection
- A working server which can serve requests
- A credit card
- A real operating system, Linux
The choice of a laptop is driven by its power backup feature, ensuring your server remains up and running. It’s also a good idea to have an Uninterruptible Power Supply (UPS) for added security.
Why Use a Credit Card?
You’ll need a credit card for a few essential steps:
- Purchasing a domain name.
- Setting up a server on the cloud, often available with free trials on platforms like AWS, GCP, or Oracle Cloud.
Getting Started:
- Check your IP addresses using commands like
ip addr showorifconfig. You’ll typically see anIPv4 address, anIPv6 address, and apublic IPv6 address. Most routers and ISPs now provide IPv6 addresses, simplifying the initial setup. - Assume your server is running on port
:3000. Without a firewall initially, you can access your website via thepublic IPv6 addressfollowed by the port number. - Note that device compatibility may vary. Some devices, like the iPhone 13 Pro, come with built-in IPv6 support, while others may require manual configuration.
DDNS:
The ipv6/ipv4 addresses assigned to you by your ISP can change. Like when you maybe restart your router, or the ISP did some changes.
These is where you either need a Dynamic DNS or contact your ISP for a static IP address. But the later is not what I want to do, I am already paying 1500 INR for my internet services and I am cheap.
Dynamic DNS providers make it dead simple to assign a memorable name to your home IP address by automatically updating your public-facing domain name entry to point at your home internet IP address at any given moment.
And it does just that, there are a couple of free providers, one of the notable ones is no-ip.com . You can also find a list of it in your router config.
No-IP | Smarter DNS Starts Here
Generally your router should have a settings where you can update the credentials for your account at no-ip.com . Or you can have a cronjob which makes a request to the api which updates the ip every couple of minute interval.
In the above scenario, you don’t need to worry about the ipv4, you need to point the domain name to the ipv6 address.
The other alternative here would be to update the AAA record in your hosting provider. But I am not sure if all of them provide an API to update it.
tl;dr just get a dynamic domain name, pointing to the public ipv6 address. It should look something like this:
$> inet6 i::p::v::6/64 scope global dynamic noprefixroute
Well, in the end when we do end up using a vps from cloud we can get rid of the above
Setting up your machine:
First, setup nginx along with ssl certificates using letsencrypt. (I am not going to expand on this right now, please check the article below)
How To Secure Nginx with Let's Encrypt on Ubuntu | DigitalOcean
Second, Modify your nginx config server block to match the proper domain name, and terminate the ssl at the nginx layer.
Nginx is going to act as a reverse proxy, that will forward the request to your server and then send the response back from the server via nginx.
Third, Setup firewall and also enable sshd. For a firewall I chose to use ufw.
The configuration is to block everything except SSH and NGINX. You can find the setup guide here, on a digitalocean article.
.png)
UFW Essentials: Common Firewall Rules and Commands for Linux Security | DigitalOcean
And this awesome article from zerotier

The State of NAT Traversal
Hosting:
Pretty straightforward here, get a cheap domain name. I got a domain name .shop , at 80 INR per year.
- Purchase an affordable domain name, such as .shop.
- Point the ALIAS to the domain name provided by your DDNS provider.
- At this point, users with IPv6-enabled devices should be able to access your website.
Solving for the IPv4 NAT Problem:
The assigned ipv4 obviously doesn’t work for you, because its not a static public IP address, atleast not in India.
The assigned ipv4 is inside a NAT, which is why your public ip doesn’t match whatever you see in ifconfig or ip addr show.
( If you are not sure about NAT, here is a short introduction )
The solution is to use a VPS/VPN provider. But again that requires spending money, and I am cheap.
So we have wireguard or zerotier to rescue. I f***ng love free software.
The way this will work is, somewhat like a peer to peer connection, a mesh of sorts, where multiple machines can join the zerotier network and they can be access each other within the mesh.
So,
- You get an account in AWS or GCP, each has their own free tier plans.
- Use it to setup a small box maybe like 2 core cpu with 1GB RAM.
- Create an account in zerotier and create a network
- Install zerotier-cli
- Using the above, join the network, from both the laptop and the VM you just created in cloud. And follow the getting started guide above.
You should click on the Auth checkbox.
To test if its working, you should see the zerotier ip’s in the zerotier webUI or even when you run ifconfig.
Try to ping each other using the assigned IPs.
Once successfull, you can use socat or iptables to forward the requests from the cloud VM to your local machine.
One example configuration which forwards the ssl traffic to a target ip will look like this.
socat TCP-LISTEN:8080,fork,reuseaddr TCP:target-ip:443
Curtains Call:
Now your cloud VM has a public ip address, and if not you can probably enable it from your cloud provider settings.
This is the IP that we will add as an A record to our hosting provider. And this is how the whole thing works.
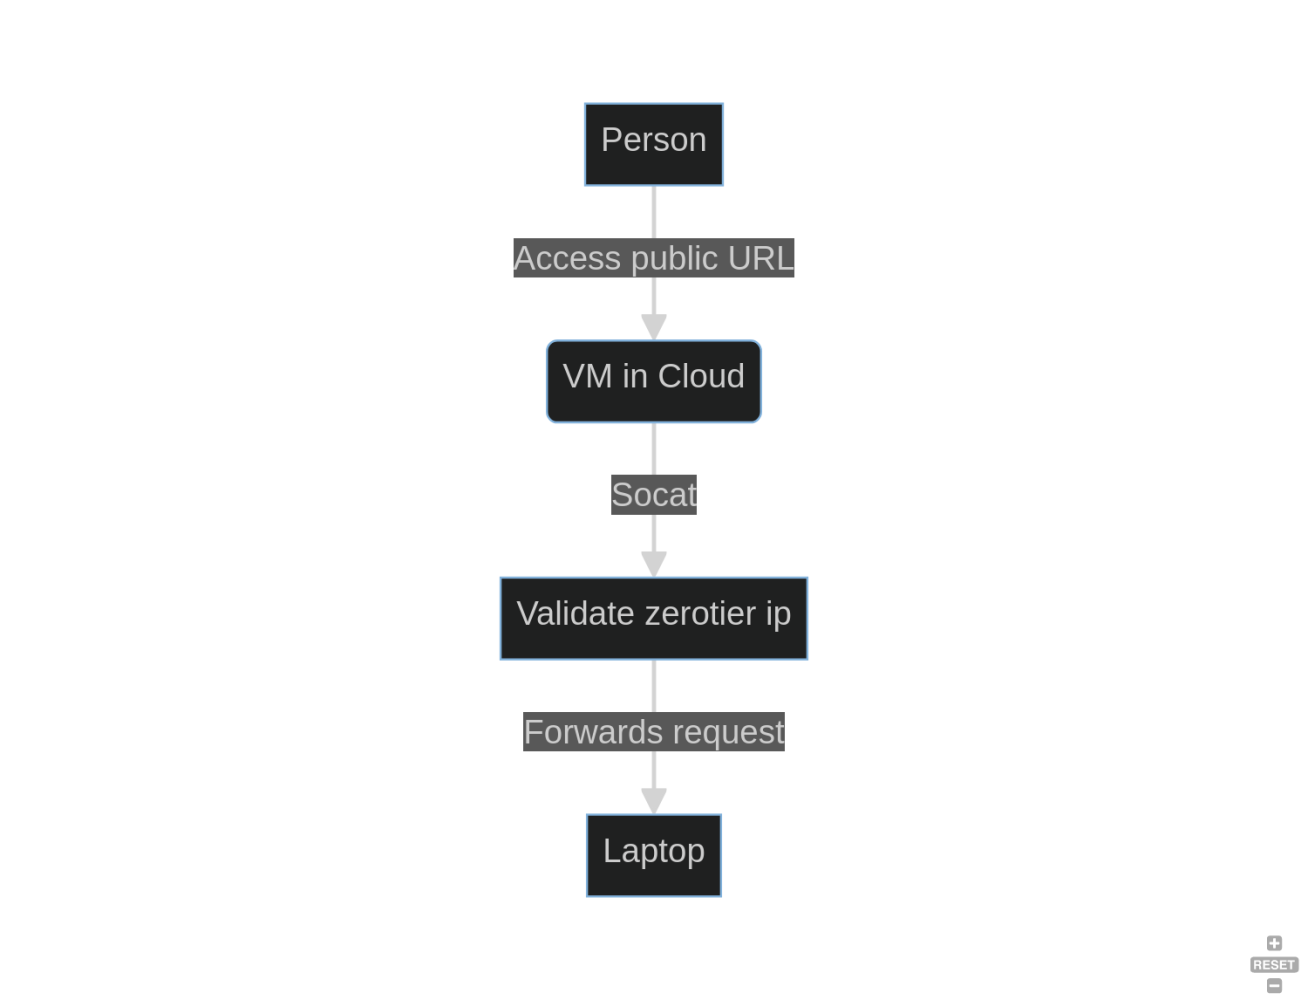
And volla, now when you try to access on your android phone, which doesn’t support ipv6 or doesn’t have it enabled by default, can easily access your website.
You can check out a working demo at https://mr-notorious.shop .
Obvious Cons:
Of course, hosting your website at home comes with some challenges:
- You need to take care of security (Try to harden the OS)
- You can run out of disk space (Setup things like log rotate, switch hard disks, mount a disk as a partition inside /etc/fstab)
- Handling databases is no longer fun.
- You have to keep updated with regular updates and patch management. Like
certbot,database backups - You definitely need some monitoring, here again for sending notifications you can use https://ntfy.sh/ , or roll one with zerotier.
- You also are limited to using one server. Which is your laptop. So yeah memory management and scaling is a big challenge.
- Using an Intrusion Detection System like fail2ban or Snor
Well, this is not for production use. But you can host your own stuff without paying to providers. We did however didn’t consider some points.